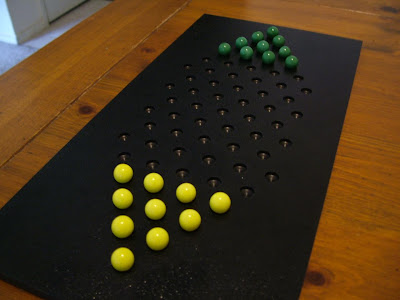
Two Player Chinese Checkers Board
For anyone who doesn't happen to have a subscription to Make Magazine, let me say that their latest issue (#28) is quite good. The theme is "Toys and Games," and after reading through it there are more than one projects I think I'm going to do something with.
The first such project which I have gotten a chance to build is the two-person Chinese Checkers board. Traditional Chinese Checkers is a six-person board, but that comes with a short-fall; four or six people playing and strategy is usurped by chaos; two players playing and the wide expanse of board allows much confrontation to be avoided. On pages 56-57, Charles Platt gives plans for this two-player configuration [PDF warning]. I liked the look of his board in black ABS, so while I was in Sacramento for the FE exam, I stopped by my nearest TAP Plastic and picked up a piece of 8"x16.75" single-side textured ABS. I think the cost of it came to something like $12.
Of course, in the article, he explains how to drill the hexagonal matrix of holes by hand using a drill press, but trying to drill 61 holes by hand and get them to all line up just right seems like a tedious task to me. Luckily, since I am a mechanical engineer at a world-class university (and paying quite a bit more than expected for the pleasure), I figured I would utilize the facilities provided to me for such personal projects.
As a student of the mechanical and aerospace engineering department at UC Davis, I am allowed access to the Engineering Fabrication Laboratory, which gives me access to 6 CNC end mills, plus as many lathes, and various other useful equipment such as drill presses, fully equipped welding bays, a sheet metal brake, wire EDM, the list goes on.
It was these CNC mills of interest here. They're outfitted with MillPWR CNC controllers, which means that you can program drill patterns quite easily through the attached control panel (and save said patterns to floppy disk). I figured out what the file format is for the hole patterns, and then wrote the code needed for the tedious task of these 61 holes.
Now drilling the entire board is simply a matter of telling the mill exactly where the bottom left corner of the ABS plastic is, and then successively telling it to move to the next hole position and manually drilling the hole. You can automate the entire drilling process, but it is often faster to control the drill speed manually than to have the mill operate on its own.
Look forward for other projects from this issue, or shout out in the comments if you've done anything from it yet as well. I'll hopefully have some more time for such next quarter. If you don't yet have a subscription to Make, I'd highly urge you to; it may be only a quarterly issue, but they are always of high quality.
Appendix A: MillPWR code


