Controlling a Crosswalk Signal
Two weeks ago was my not-boss's birthday (he wasn't my boss, but answered all of our silly intern questions). Hes that guy in the office who managed to get nerf guns banned, so I needed to come up with something fitting for his birthday. Luckily, in my many years of digging through surplus stores, I knew exactly what I wanted to get him, and exactly which bin it has sat in at Weird Stuff.
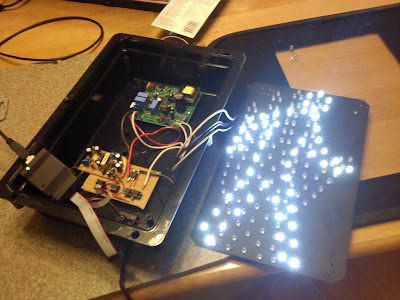
That's right. A cross walk signal. A real, genuine, GE crosswalk signal. But, a crosswalk signal by itself wouldn't have been good enough, so I decided to add a simple microcontroller circuit to it to emulate the standard crosswalk signal pattern. In the picture, the green board on top is the original power supply / LED driver that came with the sign, and the tan board below it is the part I added. The second tan board to the left is a scrap 5V supply I had sitting around to save myself the trouble of building it from components. Shown in the picture is my USBtinyISP hanging off the board for development.
Video:
The circuit for this consists of little more than an ATtiny85, a couple TRIACs to switch the 120VAC for the LED driver, and a off-the-shelf 5V power supply. Note that I used essentially none of the protective circuits around the TRIACs (snubbers, current limiters on the optos, etc), so before implementing TRIACs, understand what trade-offs you can make in your design. I probably could have even gotten away without the second larger TRIAC being triggered by the optoisolated one, since I'm only driving 6W worth of LEDs...
One thing I found very surprising about the LED driver that came with the sign was that it was not just two separate LED drivers for the walk and stop signals. One of the two lines was power for the entire sign, and the second line was a latch that switched from the hand to the walk signal. This means to go from the hand to the walk only requires pulsing the latch line, but there is no way to go from the walk signal back to the hand without completely removing power from the sign (watch a walk signal the next time you're out; you'll see that it always turns the walk off, then starts blinking the hand.).
Parts list:
He really appreciate it, and it was a nice finish to the long lasting mark I left at that internship...
That's right. A cross walk signal. A real, genuine, GE crosswalk signal. But, a crosswalk signal by itself wouldn't have been good enough, so I decided to add a simple microcontroller circuit to it to emulate the standard crosswalk signal pattern. In the picture, the green board on top is the original power supply / LED driver that came with the sign, and the tan board below it is the part I added. The second tan board to the left is a scrap 5V supply I had sitting around to save myself the trouble of building it from components. Shown in the picture is my USBtinyISP hanging off the board for development.
Video:
The circuit for this consists of little more than an ATtiny85, a couple TRIACs to switch the 120VAC for the LED driver, and a off-the-shelf 5V power supply. Note that I used essentially none of the protective circuits around the TRIACs (snubbers, current limiters on the optos, etc), so before implementing TRIACs, understand what trade-offs you can make in your design. I probably could have even gotten away without the second larger TRIAC being triggered by the optoisolated one, since I'm only driving 6W worth of LEDs...
One thing I found very surprising about the LED driver that came with the sign was that it was not just two separate LED drivers for the walk and stop signals. One of the two lines was power for the entire sign, and the second line was a latch that switched from the hand to the walk signal. This means to go from the hand to the walk only requires pulsing the latch line, but there is no way to go from the walk signal back to the hand without completely removing power from the sign (watch a walk signal the next time you're out; you'll see that it always turns the walk off, then starts blinking the hand.).
Parts list:
- 1 GE cross walk signal ($10 at Weird Stuff in Sunnyvale)
- 5V power supply scavenged from an old cell phone charger
- ATTiny85 (flash space is probably overkill, but it's the smallest AVR I had. A tiny25 would probably work) (Digikey $2.26)
- 2x >=400V optoisolated TRIACs (MOC3063 - Digikey $0.74)
- 1x >=400V 10A power TRIAC (overkill, for 6W of LEDs) (Q4010R5 - Digikey $2.26)
- 2x 1k resistor
He really appreciate it, and it was a nice finish to the long lasting mark I left at that internship...


