Running NAT64 in a BGP Environment
IPv6 is one of those great networking technologies, like multicast, which makes your life as a network operator much easier, but is generally pretty useless outside of your own network if you try to expect it to work across the Internet.
People like to focus on how the percentage of traffic going over IPv6 has slowly been creeping up, but unfortunately until that number reaches practically 100%, an Internet connection without IPv4 connectivity is effectively broken. Ideally, everyone runs dual-stack, but the whole shortage of IPv4 addresses was the original motivator for IPv6, so increasingly networks will need to run native IPv6 plus some form of translation layer for IPv4, be it carrier grade NAT on 100.64.0.0/10, 464XLAT, or as I’ll cover today, NAT64.
NAT64 is a pretty clever way to add IPv4 connectivity to an IPv6-only network, since it takes advantage of the fact that the entire IPv4 address space can actually be encoded in half of a single subnet of IPv6. Unfortunately, I also found it somewhat confusing since there are actually quite a few moving parts in a functional NAT64-enabled network, so I figured I’d write up my experience adding NAT64 to my own network.
There are really two parts to NAT64, and to make it a little more confusing, I decided to add BGP to the mix because it’s a Sunday and I’m bored.
- A DNS64 server, which is able to give a AAAA response for every website. For what few websites actually have AAAA records, it just returns those. For websites which are IPv4 only, it returns a synthetic AAAA record which is the A record packed into a special IPv6 prefix. The RFC recommended global prefix for this packing is 64:FF9B::/96, but there could possibly be reasons to use any /96 out of your own address space instead (I can't really think of any). I'm using the standard 64:FF9B::/96 prefix mainly because it means I can use Google's DNS64 servers instead of running my own.
- A NAT64 server, which translates each packet destined for an IPv4 address packed in this special IPv6 /96 prefix to an IPv4 packet from an IPv4 address in the NAT64's pool destined for the actual IPv4 address to be routed across the Internet. My NAT64 server goes a step further and NAT's all of these IPv6-mapped IPv4 addresses to one public address, since mapping IPv6 to IPv4 addresses one-for-one doesn't gain me much.
- BGP to inject a route to 64:FF9B::/96 towards the NAT64 server into my core router. Realistically, you could just do this with a static route on your router pointed towards your NAT64's IPv6 address, but I want to be able to share my NAT64 server with friend's I'm peered with over FCIX, so since BGP is a routing policy protocol, it helps. If you're not running a public autonomous system, just ignore anything I say about BGP and point a static route instead.
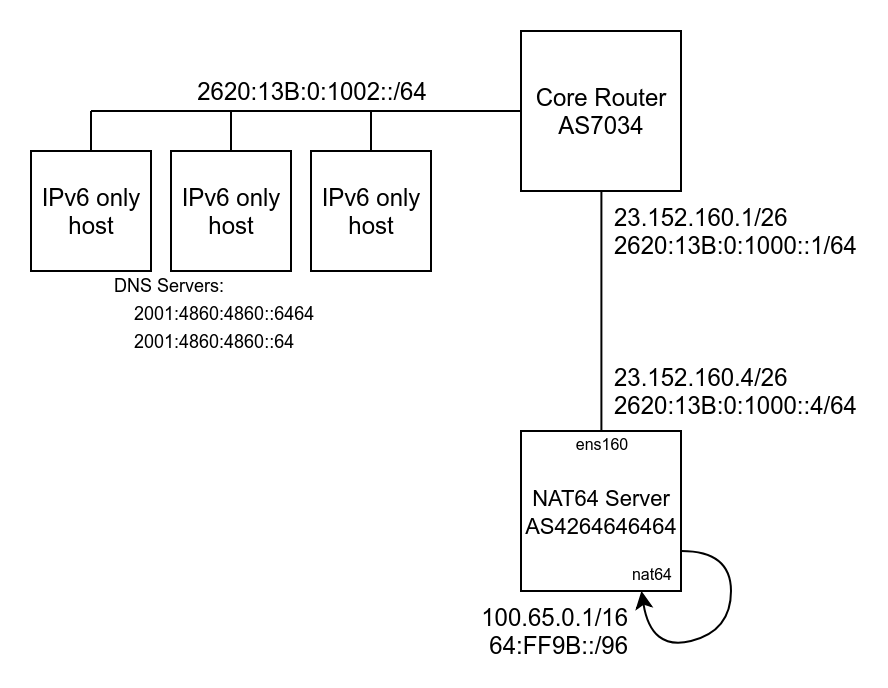
So to do this, I’m using a software package called Tayga, along with these numbers (to make my specific example clearer):
- 23.152.160.4/26 is the public IPv4 address of my NAT64 server. You would replace this address with whatever IPv4 address you wanted all your NATed traffic to be sourced from in the end.
- 2620:13B:0:1000::4/64 is the public IPv6 address of my NAT64, which is the gateway to the special /96 prefix containing all IPv4 addresses. This address again needs to be something specific to your network, and is mainly important because it's where your route to the /96 needs to point.
- 64:FF9B::/96 is the standard prefix for NAT64. There's no reason to change it to anything else.
- 100.65.0.0/16 is an arbitrary big chunk of local-use-only addresses I picked for this project. For how I have my NAT64 server configured, it really didn't matter what prefix of CGNAT or RFC1918 address space I picked here, since it's really only used as an intermediary between the client's actual IPv6 source address and the single public IPv4 address that they're all NATed to. A /16 is plenty of address space, since trying to NAT even 64k hosts to a single public IPv4 address is going to be a bad time. Theoretically there is ways to use CGNAT concepts to use a whole pool of IPv4 addresses on the public side, but one address is plenty for my needs.
- AS4264646464 is an arbitrary private-use ASN I picked to be able to set up an eBGP peering session between my NAT64 server and my core AS7034 router.
The source IPv6-only host makes a DNS query against a DNS64 server, which encodes IPv4 A records into the bottom 32 bits of the 64:FF9B::/96 subnet as a AAAA record, which gets routed to the NAT64 server:
[SOURCE IPv6 ADDRESS] > 64:FF9B:0:0:0:0:[DESTINATION IPv4 ADDRESS]
Tayga allocates an address out of its 100.65.0.0/16 NAT pool for the IPv6 source address, and translates the packet on the nat64 loopback interface to:
100.65.X.Y > [DESTINATION IPv4 ADDRESS]
The iptables nat MANGLE rule set up by Tayga then NATs the local 100.65.0.0/16 subnet to the one public address and sends the packet on its way:
23.152.160.4 > [DESTINATION IPv4 ADDRESS]
And dramatically, the IPv6 packet has been translated into an IPv4 packet, with the NAT64 server holding two pieces of NAT state; one in Tayga for the IPv6 to IPv4 translation, then one in iptables for the CGNAT address to public address translation.
Setting up Tayga
Starting from a stock Ubuntu 18.04 system, sudo apt install tayga gets us the needed NAT64 package, and edit the /etc/netplan/01-netcfg.yaml file to match your network.
The Tayga config (/etc/tayga.conf) is relatively short, ignoring all the comments. The main parameters to update are the “ipv4-addr” so it’s inside your local use IPv4 block, “dynamic-pool” to match the ipv4-addr, “ipv6-addr” to your public IPv6 address on the server, and turn on the “prefix 64:ff9b::/96” option.
# Uncomment the next line to enable packet forwarding for IPv4
net.ipv4.ip_forward=1
# Uncomment the next line to enable packet forwarding for IPv6
net.ipv6.conf.all.forwarding=1
# TUN device that TAYGA will use to exchange IPv4 and IPv6 packets with the
# kernel.  You may use any name you like, but `nat64' is recommended.

tun-device nat64

# TAYGA's IPv4 address.  This is NOT your router's IPv4 address!  TAYGA
# requires its own address because it acts as an IPv4 and IPv6 router, and
# needs to be able to send ICMP messages.  TAYGA will also respond to ICMP
# echo requests (ping) at this address.
#
# This address can safely be located inside the dynamic-pool prefix.
#
# We're using the pool 100.65.0.0/16, so lets take the first addr in that pool
#
# Mandatory.
#
ipv4-addr 100.65.0.1

#
# TAYGA's IPv6 address.  This is NOT your router's IPv6 address!  TAYGA
# requires its own address because it acts as an IPv4 and IPv6 router, and
# needs to be able to send ICMP messages.  TAYGA will also respond to ICMP
# echo requests (ping6) at this address.
#
# Optional if the NAT64 prefix is specified, otherwise mandatory.  It is also
# mandatory if the NAT64 prefix is 64:ff9b::/96 and ipv4-addr is a private
# (RFC1918) address.
#
# This is set to our system's public IP address to match /etc/netplan/01-netcfg.yaml

ipv6-addr 2620:13B:0:1000::4

#
# The NAT64 prefix.  The IPv4 address space is mapped into the IPv6 address
# space by prepending this prefix to the IPv4 address.  Using a /96 prefix is
# recommended in most situations, but all lengths specified in RFC 6052 are
# supported.
#
# This must be a prefix selected from your organization's IPv6 address space
# or the Well-Known Prefix 64:ff9b::/96.  Note that using the Well-Known
# Prefix will prohibit IPv6 hosts from contacting IPv4 hosts that have private
# (RFC1918) addresses, per RFC 6052.
#
# The NAT64 prefix need not be specified if all required address mappings are
# listed in `map' directives.  (See below.)
#
# Optional.
#
# 64:ff9b is the standard prefix used by public DNS64 servers
prefix 64:ff9b::/96

#
# Dynamic pool prefix.  IPv6 hosts which send traffic through TAYGA (and do
# not correspond to a static map or an IPv4-translatable address in the NAT64
# prefix) will be assigned an IPv4 address from the dynamic pool.  Dynamic
# maps are valid for 124 minutes after the last matching packet is seen.
#
# If no unassigned addresses remain in the dynamic pool (or no dynamic pool is
# configured), packets from unknown IPv6 hosts will be rejected with an ICMP
# unreachable error.
#
# Optional.
#
# We picked this out of the carrier grade NAT 100.64.0.0/10 pool.
#   Not that it particularly matters. This pool of addresses never leaves this host
#
dynamic-pool 100.65.0.0/16

#
# Persistent data storage directory.  The dynamic.map file, which saves the
# dynamic maps that are created from dynamic-pool, is stored in this
# directory.  Omit if you do not need these maps to be persistent between
# instances of TAYGA.
#
# Optional.
#
data-dir /var/spool/tayga
The second file you need to edit to enable Tayga is the /etc/default/tayga file, which feeds parameters into the /etc/init.d/tayga RC file (which you don’t need to touch).
Key parameters to note in the defaults file is to change RUN to yes, and make sure both CONFIGURE_IFACE and CONFIGURE_NAT44 are turned on so the RC file will do all the iptables setup for us.
# Defaults for tayga initscript
# sourced by /etc/init.d/tayga
# installed at /etc/default/tayga by the maintainer scripts

# Change this to "yes" to enable tayga
RUN="yes"

# Configure interface and set the routes up
CONFIGURE_IFACE="yes"

# Configure NAT44 for the private IPv4 range
CONFIGURE_NAT44="yes"

# Additional options that are passed to the Daemon.
DAEMON_OPTS=""

# IPv4 address to assign to the NAT64 tunnel device
IPV4_TUN_ADDR=""

# IPv6 address to assign to the NAT64 tunnel device
IPV6_TUN_ADDR=""
At this point, you should be able to sudo service tayga start and do a sanity check by looking at your IPv4 and IPv6 routing tables and seeing the prefixes referenced in the Tayga config added to a new nat64 tun network interface.
kenneth@kwfnat64:~$ ip route
default via 23.152.160.1 dev ens160 proto static
23.152.160.0/26 dev ens160 proto kernel scope link src 23.152.160.4
100.65.0.0/16 dev nat64 scope link
kenneth@kwfnat64:~$ ip -6 route
64:ff9b::/96 dev nat64 metric 1024 pref medium
2620:13b:0:1000::/64 dev ens160 proto kernel metric 256 pref medium
2620:13b:0:1000::/64 dev ens160 proto ra metric 1024 pref medium
fe80::/64 dev ens160 proto kernel metric 256 pref medium
fe80::/64 dev nat64 proto kernel metric 256 pref medium
default proto static metric 1024
	nexthop via 2620:13b:0:1000::1 dev ens160 weight 1
	nexthop via fe80::209:7bff:fe9f:580 dev ens160 weight 1
Enabling Forwarding in sysctl.conf
Unfortunately, while the Tayga RC file does a good job of setting up the tun interface and NAT iptable rules, the one thing it doesn’t do is turn on IPv4 and IPv6 forwarding in general, which is needed to forward packets back and forth between the public interface and the nat64 tun device. Uncomment the two relevant lines in sysctl.conf and restart.
# ... SNIP the rest of this file except the two important lines

net.ipv4.ip_forward=1
net.ipv6.conf.all.forwarding=1
Setting up BGP to advertise the NAT64 prefix
For exporting the /96 of NAT64 prefix back into my networks core, I decided to use the Quagga BGP daemon. This is a pretty standard configuration for Quagga, exporting a directly attached prefix, but for completeness…
sudo apt install quagga
sudo cp /usr/share/doc/quagga-core/examples/zebra.conf.sample /etc/quagga/zebra.conf
sudo touch /etc/quagga/bgpd.conf
sudo service zebra start
sudo service bgpd start
sudo vtysh
I then interactively configured BGP to peer with my core and issued the write mem command to save my work. There’s plenty of Quagga BGP tutorials out there, and the exact details of this part is a little out of scope for getting NAT64 working.
!
! Zebra configuration saved from vty
!   2019/02/03 15:05:17
!
!
router bgp 4264646464
 bgp router-id 23.152.160.4
 neighbor 2620:13b:0:1000::1 remote-as 7034
 neighbor 2620:13b:0:1000::1 description BGP session back to core1
 no neighbor 2620:13b:0:1000::1 activate
!
 address-family ipv6
 network 64:ff9b::/96
 neighbor 2620:13b:0:1000::1 activate
 neighbor 2620:13b:0:1000::1 prefix-list nat64-only out
 exit-address-family
 exit
!
ipv6 prefix-list nat64-only seq 5 permit 64:ff9b::/96
!
line vty
!
At this point, my network has NAT64 support, so any IPv6-only hosts which are configured with a DNS64 name server can successfully access IPv4 hosts. I wouldn’t depend on this one VM to serve a whole ISP’s worth of IPv6-only hosts, but for a single rack of VMs which just need to be able to reach GitHub (which is still amazingly IPv4 only) to clone my config scripts, this setup has been working great for me.