Tutorial on Using the Jointer / Planer

We’re rounding in on the end of my woodworking series for this winter. For this last major tool (except the lathes, which are a whole other series of their own), I’m going to talk about the Jointer / Planer.
The Jointer / Planer is a combination tool, the jointer on the left, and the planer on the right. The jointer/planer is primarily used to make boards straight. When you buy wood from a lumber yard, it is still very wet, and as it dries it will inevitably warp in one or more dimensions. Of course, these warps aren’t generally appreciated in fine cabinetry (unless you’re using it to make a bold statement or something). Traditionally, this warp and bow of a board was corrected by using hand planes (which I have several of), but I was a little compressed for time this break, so why break a sweat when you can throw 120VAC at the problem?
Given a board that is arbitrarily shaped, you first need to form a single straight side, which you’ll use as the reference for every other side. This is done on the jointer, which is the long platform on the left of the picture at top (that my elbow is leaning on). It consists of the in-feed table in the foreground, and the out-feed table beyond the blades (which are under the bright red guard). Both feed tables were machined to be very flat, and the in-feed table has a screw thread underneath allowing you to offset it below the plane of the blades and out-feed table by anything between almost zero and almost an eight of an inch. I tend not to use the jointer adjustment much; I have it set at 1/32” and will just keep taking passes on it until the board’s flatness meets my requirements. After feeding a board through the jointer, its flatness can be checked with a good quality, and very long, level.
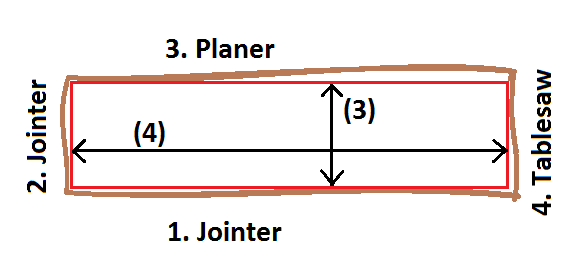
Once the first face is flat, you can turn the board 90 degrees and use the first side as a reference to get one of the sides flat and square to the first (so the board doesn’t end up as a parallelogram). Once you have this second side flat and square, you would eventually rip the final width of the board on the table saw, since the jointer has no control on the final geometry of the board; it just makes a side flat. This is shown as step four in the diagram above.
To get the second wide face flat and parallel to the first, you would run it through the planer. The planer has an adjustable bed, which you can raise or lower to meet the requirements of your board. On the in-feed side, it also has a veneer gauge showing how many 32nds of an inch you will be taking off on the pass. Unlike the jointer, once you run a board through the planer, if you were to run it through again, it would remove almost no material, so you will need to continually raise the bed until the board is flat and meets your final thickness requirement. As shown in the diagram above, this third step is what you use to define the thickness of the board, should it need to be the same as another board, fit in a dado, etc.
In addition to being useful for flattening wide boards, I’ve used the planer as an easy way to reduce 4”x4” fence posts while keeping them square, by feeding it through, then turning it 90 degrees and feeding it through again. This is how I was able to make the 3”x3” stock for my Kubb set all from a single fence post.